Encounters with Twilight is a 1-player PvE scenario that can be played on Standard, Advanced and Expert difficulty. It is part of the campaign story The Curse.
Aid Rogan Kayle and a ragtag band of human refugees in their clash with an unknown evil.
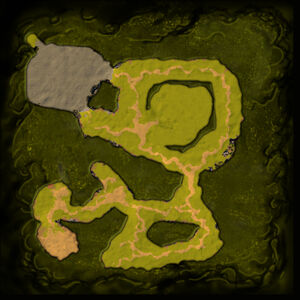
The first mission in The Curse storyline. In this first real mission, you must assist ![]() Rogan Kayle in his journey across the surface, through several Twilight villages.
Rogan Kayle in his journey across the surface, through several Twilight villages.
Story
Plot
| The sun’s death lasted only a year, but it changed the world. When mortals returned to the surface they found a strange curse had fallen upon those who had remained. They were now vile and twisted abominations, creatures who knew only hate and madness. For Rogan Kayle and a group of human refugees the long journey home had become a terrifying battle for survival as they emerged into a world forever changed. |
| — The Aedai Chronicles |
Rogan Kayle had never been a man of prayer but as he stumbled through the twisted land he had once called home he knew that might change.
Dropping heavily against a mossy boulder, his eyes feverishly scanned the rocky landscape for his pursuers. They were nowhere to be seen, but Rogan knew they were close. Once noble Windweavers, elven rangers of Wildheart forest, they were now abominations who simply hungered for his flesh. Ahead in the distance he could hear the screams other refugees and roars of something big, possibly another giant hunting for sport. Rogan pushed himself back to his feet, knowing his pursuers would be upon him at any moment. But as he prepared to run he found he could not move. There was no place to turn anymore. This land did not belong to humans, surely all was lost. His gaze fell on one of the old mossy stones. It formed part of an old monument, a relic created by the long-lost Amii.
To what end, Rogan did not know, maybe worship of the gods. Hadn’t they, with the Skylords, once defeated the giants? Where were they now? Would they let the world end this way?
With sudden fury Rogan hurled his sword at the encrusted monument. As thesteel clattered off the massive stone, it tore away some moss. For a moment all was quiet, even the wind seemed to hold its breath. Then, a faint glimmer of light built at the tip of the ancient stone. It grew in power and spread downwards, peeling off emerald moss to reveal intricate glyphs carved deep into the stonework. Terrified, Rogan dropped to his knees. With no hope left to light his way, no path out of the darkness, his lips began to move. He prayed to any god who would listen. And he was answered.
Conclusion
| Before The Twilight Wars, Rogan Kayle thought himself a simple man with simple needs. It was only the attention of a Skylord that thrust him onto fate’s path. Yet while Rogan began life as neither wise or noble, the spark of greatness was within him. The Skylord Viridya sensed this and – against her absent father’s express wishes – urged other Skylords to aid her in creating a symbol of hope for the mortals. Some answered her call. Rogan showed mortals if you were willing to stand up and fight for your home, the Skylords would aid your cause. Eternal glory or total damnation awaited the former thief, a fact history shows he became increasingly aware of. |
| — The Aedai Chronicles |
Rogan pushed his group hard, afraid of being asked what was going to happen at the city called Hope. If the curse was there too then where could they truly call home? Heavy armor chafed his sweating body but Rogan tried to ignore the pain as his mind raced, desperately trying to come up with a plan. The old sun’s death had heralded not only the freezing twilight, but also a terrible curse. It had corrupted the creatures that had stayed on the surface during the twilight.
Now, with giants hunting them,the humans had been driven straight into the fangs of a new threat . Maybe, Rogan mused, urging the other northlanders along, someone at Hope knew of a safe haven.
Part of him wanted to disappear into the night, escape the role of leader thrust so suddenly upon him. But then what? Rogan lowered his head and picked up the pace, they had to reach Hope in time. His men glanced at one another, wondering what kind of man their new leader would prove to be.
As the Rogan and his men departed, Viridya’s image descended onto the burial hill where the Wrathgazer had fallen.
She knew why she had come. It was here the girl had been buried so many generations before.
Viridya could still feel the faint echo of her presence lingering between the old roots. The Skylord Viridya touched a ghostly hand to the scorched ground. Time would tell if she could bear a legacy she had not asked for.
Rewards
Strategy & Notes
- Although somewhat linear, not as much as
 Introduction, there is some degree of choice available in this mission. You are able to choose how you approach the meat of this mission: Clearing the first and second villages of the Twilight Curse.
 - This mission allows you to decide whether or not to attack or to defend for the third phase, which one you choose significantly alters the difficulty depending on your deck, especially on Expert.
- At the end of the mission, you must face off against the Twilight Wrathgazer, the very first true boss enemy in the game with 62000 (31000 on standard) hit points and a disintegrating gaze that can destroy any of your units. Fortunately, they are alone and you have time to build up as big of an army as you need to take him down.
Walkthrough
The mission starts in the thick of combat. Rogan will speak briefly before you are able to summon your first units, and your first main target will be to dispatch a ![]() Twilight Devastator, which has capped health until you inflict damage. Once defeated, claim the power well and build an army to move east. When you engage, be wary: Two squads of
Twilight Devastator, which has capped health until you inflict damage. Once defeated, claim the power well and build an army to move east. When you engage, be wary: Two squads of ![]() Twilight Minions and a
Twilight Minions and a ![]() Twilight Brute will advance on your position. From here, dispatch the two Brutes next to the Amii Gate and claim the second monument.
Twilight Brute will advance on your position. From here, dispatch the two Brutes next to the Amii Gate and claim the second monument.
Rogan will talk about the next area briefly before the gate is opened. A ![]() Twilight Slaver will pursue several lyrish civilians through the gate. Defeat him as he approaches, but clear the area when he falls, as he explodes when defeated. Move into the next area, and you will come under attack by four squads of Twilight Minions and a Twilight Archer. Defeat them and destroy the
Twilight Slaver will pursue several lyrish civilians through the gate. Defeat him as he approaches, but clear the area when he falls, as he explodes when defeated. Move into the next area, and you will come under attack by four squads of Twilight Minions and a Twilight Archer. Defeat them and destroy the ![]() Twilight Infestation nearby to clear the power well. From here, you can choose to move east or move south. If you choose to go east, two brutes guard an infestation and a
Twilight Infestation nearby to clear the power well. From here, you can choose to move east or move south. If you choose to go east, two brutes guard an infestation and a ![]() Twilight Skyscorcher. An ambush may be triggered as you approach, and when you destroy the infestation two
Twilight Skyscorcher. An ambush may be triggered as you approach, and when you destroy the infestation two ![]() Twilight Crawlers will emerge from the wreckage and attack you.
Twilight Crawlers will emerge from the wreckage and attack you.
If you choose to go south, face a Slaver and destroy an infestation and ![]() Twilight Infected Tower Beware, as an ambush from the east may come to attack you! Claim the third monument. Once claimed, you can advance east to the largest camp: Its primary inhabitant is another Devastator, which you will need to dispatch. Be warned, once it falls a
Twilight Infected Tower Beware, as an ambush from the east may come to attack you! Claim the third monument. Once claimed, you can advance east to the largest camp: Its primary inhabitant is another Devastator, which you will need to dispatch. Be warned, once it falls a ![]() Twilight Hag will appear from the nearby cave. Destroy the infestation and skyscorcher, and this section is clear. Now comes the tricky part, as you will meet
Twilight Hag will appear from the nearby cave. Destroy the infestation and skyscorcher, and this section is clear. Now comes the tricky part, as you will meet ![]() Viridya and she will explain the next stage: A massive twilight village up north past an Amii gate. You are given two choices: Attack or Defend.
Viridya and she will explain the next stage: A massive twilight village up north past an Amii gate. You are given two choices: Attack or Defend.
If you choose to attack, you must be aware of the ![]() Twilight Hulk that skulks around the area. Utilizing large quantities of
Twilight Hulk that skulks around the area. Utilizing large quantities of ![]() Swamp Drakes will make short work of it. You also need to content with patrols of brutes, slavers, and archers around the area. It is full of various infestations, towers, and a single
Swamp Drakes will make short work of it. You also need to content with patrols of brutes, slavers, and archers around the area. It is full of various infestations, towers, and a single ![]() Twilight Manifestation is at the center which could respawn the hulk if left up too long. Also beware of the flying
Twilight Manifestation is at the center which could respawn the hulk if left up too long. Also beware of the flying ![]() Twilight Creeps in the area too, and two ambush zones of Twilight Pests.
Twilight Creeps in the area too, and two ambush zones of Twilight Pests.
If you choose to defend, construct the wall near the Amii gate and start building your defense. ![]() Necroblaster is extremely effective here, as is the
Necroblaster is extremely effective here, as is the ![]() Morklay Trap. Man the walls with your best archers, and make sure your defense is solid. After 180 seconds, you can activate the
Morklay Trap. Man the walls with your best archers, and make sure your defense is solid. After 180 seconds, you can activate the ![]() Amii Screaming Stone on the hill in the center, and this will destroy every building in the northern camp, and call every enemy to attack through the gate. Prepare for a huge fight, and beware the hulk who can smash through your wall effortlessly.
Amii Screaming Stone on the hill in the center, and this will destroy every building in the northern camp, and call every enemy to attack through the gate. Prepare for a huge fight, and beware the hulk who can smash through your wall effortlessly.
The advanced version of this map is very similar to standard. With a few key differences:
- The largest ambush in the second area triggers much earlier.
- All Twilight Crawler ambushes spawn twice as many.
- The northern village is patrolled by Twilight Hags instead of Twilight Archers.
- If you use the Amii Screaming Stone, the enemy wave will be larger, and the Twilight Hulk will wait before attacking.
- Amii Screaming Stone can be activated 120 seconds after the Amii Gate has opened.
- The Twilight Wrathgazer has twice its HP.
- Kind Spirits can now appear during the boss fight.
- The wrathgazer can now shake the earth around him, damaging structures severely and knocking around small and medium units.
The first map available on Expert mode, and it's one of the easiest to complete.
An expert guide for completing Among the Old Gods Achievement has been provided for playthrough advice, replays and decks, written by Dallarian. [1]
Below will cover each act and the differences from other difficulties.
Act I
- The initial ambush of 2 Twilight Minions and 1 Twilight Brute are at full health now.
- Two Twilight Hags guard the T2 orb with a Twilight Infected Tower.
The most prominent feature of the first act is the presence of Twilight Hags and a tower guarding the T2 orb. This can make pushing with small units difficult, but fortunately they are susceptible to focusing attacks on a nearby squad of ![]() Northguards. If this occurs, you can safely take them out while their attention is diverted. Otherwise, engaging them with large numbers of lesser units can circumvent their knockback.
Northguards. If this occurs, you can safely take them out while their attention is diverted. Otherwise, engaging them with large numbers of lesser units can circumvent their knockback.
Act II
- A patrol consisting of a Twilight Vileblood and two Twilight Whisperer now spawn from the southeast camp, and patrol the second area in a clockwise direction.
- The area is reinforced with extra Twilight Slavers and more Twilight Infected Towers.
- The southeast camp is heavily reinforced with an extra Twilight Devastator, Twilight Hag, and a Twilight Abomination.
Easily the most difficult section of the map. Constant patrols of ![]() Twilight Vilebloods and
Twilight Vilebloods and ![]() Twilight Whisperers circle this area, and will not only aggressively attack you but also pull the attention of Rogan Kayle. Rogan cannot die, or the mission is a failure. Rogan tends to be highly aggressive to any enemy nearby, and this might lead to him charging forward into harms reach. If you engage, you must keep enemies away from Rogan to avoid him running in to attack.
Twilight Whisperers circle this area, and will not only aggressively attack you but also pull the attention of Rogan Kayle. Rogan cannot die, or the mission is a failure. Rogan tends to be highly aggressive to any enemy nearby, and this might lead to him charging forward into harms reach. If you engage, you must keep enemies away from Rogan to avoid him running in to attack.
Vilebloods leave behind deadly acid upon their death, so building power wells here is ill-advised due to the danger this poses to them. Whisperers blind your ranged units, making melee preferable as they can shut down an entire ranged assault. This combination is difficult to beat, but can be conquered if your able to make smart use of your resources.
The southeast camp has a ![]() Twilight Abomination guarding it. If you can, taking your third orb can ease the process of killing it if you can protect the orb from attacks. Otherwise, make use of your units abilities, or bring
Twilight Abomination guarding it. If you can, taking your third orb can ease the process of killing it if you can protect the orb from attacks. Otherwise, make use of your units abilities, or bring ![]() Lyrish Knight and/or
Lyrish Knight and/or ![]() Burning Spears to help counter this unit.
Burning Spears to help counter this unit.
Act III
- Amii Screaming Stone can be activated 90 seconds after the Amii Gate has opened.
- Northern village is heavily reinforced with more Towers, a Twilight Hatecaster, four Twilight Hulks, and a Twilight Dragon.
- Pairs of Twilight Hulks will periodically move south through the Amii gate to attack you, and respawn at the Twilight Manifestation.
The third act gets tricky. Once the Amii Gate opens, you will have a short time before two ![]() Twilight Hulks come charging in to attack you. For this reason, stalling the second act to build defenses is a smart move to avoid being caught by surprise. The outpost is heavily reinforced, with four different hulks throughout and even a
Twilight Hulks come charging in to attack you. For this reason, stalling the second act to build defenses is a smart move to avoid being caught by surprise. The outpost is heavily reinforced, with four different hulks throughout and even a ![]() Twilight Dragon. The dragon fortunately will not respawn upon being killed and should be a priority target if you can get at it, to remove it from the enemy forces entirely.
Twilight Dragon. The dragon fortunately will not respawn upon being killed and should be a priority target if you can get at it, to remove it from the enemy forces entirely.
If you choose to defend, try to wait for the two hulks to attack first to reduce the number of incoming XL units. If possible, kill a third one before you call the wave to reduce it further before the other two respawn. If attacking, focus your firepower on spawn buildings first to cull repeated attacks from the north.
Act IV
- Angry Spirit, Cruel Spirit and Kind Spirit spawn much more frequently than before.
Gallery


Patch History
- Adjusted the map to have different Amii Screaming Stones per difficulty.
- Active ability Sound the Call:
- Changed the initial cooldown from 180 seconds on all difficulties to 180 seconds on Standard, 120 seconds on Advanced and 90 seconds on Expert difficulty.
- Extended cast time from 1 second to 5 seconds to make the Screaming Stone animation audible and visible.
- This will delay the triggered attack wave by the same duration.
- Renamed "Encounters With Twilight" to "Encounters with Twilight" to fit the scenario naming convention.
See also
| Campaign scenarios (PvE) |
1 Player | |
|---|---|---|
| 2 Players | ||
| 4 Players | ||
| 12 Players | ||
| Player vs Player maps (PvP) | 1vs1 | |
| 2vs2 |
- ↑ https://forum.skylords.eu/index.php?/topic/7266-expert-campaign-missions-briefing-among-the-old-gods-achievement/ Dallarian's Expert Campaign Guide